Contents
This is the official Google Android site for developers. Here you will find all the documentation you need to develop rich android applications.
You will most likely visit this site often.
All tutorials and sample code are credited to their respected owners.
Portions of this page are reproduced from work created and shared by the Android Open Source Project and used according to terms described in the Creative Commons 2.5 Attribution License.
ListView Widget
In this topic we will be covering ListViews and their associated Adapters.
This topic will talk about creating a listview and how to catch events when the user selects one of the items.
A screenshot of the first example is shown here:
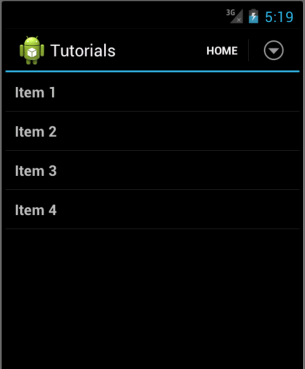 |
In this example we will cover these steps to give us the results show here.
|
Now let's go through the steps required for this example.
Open up your main layout XML file and add this bit of code below.
You can see here we added a <ListView> element and gave it an id of @+id/listView. We also set the layout width and height to fill the screen.
The next step is to add our list items, in this example we will use a string array to populate our ListView. Open up your strings.xml resource file and add the code below.
This creates a string array called list_items that we can use to fill our ArrayAdapter.
Next we need to create another layout XML file to represent our ListView row item. We will show you the code then it will be easier explain it.
The code above creates a TextView widget to be used to display the individual item data in the ListView.
Now that we have our code written, let's hook it all up in our activity. Firstly, open up your main activity and add an instance variable to hold our ListView shown below.
Now, enter this code in the onCreate() method of your activity.
Let's examine this code a bit.
The first statement simple initializes the listView variable using the findViewById() method. Then a String[] array variable is created to contain the string array we created earlier, this is done by using the getResources().getStringArray() method. Then the meat and potatoes of populating the ListView is done by assigning the ArrayAdapter to the ListView using the setAdapter() method of the ListView.
You can change the appearance of the ListView items by modifying the underlying row layout XML file. We will demonstrate this next.
Customizing the appearance of the ListView
Next we will look at how we can change the appearance of our ListView items.
As mentioned previously, we can accomplish this by modifying the underlying item's layout XML file, in our case that would be the list_item.xml file.
Let's start by changing the lines android:textSize="16dip" to "18dip" and add android:textColor="#A52A2A". The new ListView is shown below.
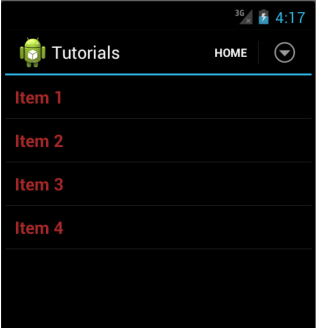 |
Now run the app again and it should look like this NOTE: Depending on your resolution and android version the appearance may differ than what you see here. |
Populate a ListView from a Database
In this section we will learn how to populate a ListView from a database column. This example assumes you already have a working database. Even though we will be using arbitrary data here, it should be easy for you to modify it to hold your own data.
To make this happen, we get our database column data using the CursorAdapter class, then when can assign this adapter to our ListView.
The code to populate our ListView is shown below, check it out and then we'll go over it in more detail.
The first line of the method above calls the user defined method db.fetchAllTitles() which fills our cursor with the title field of our database. Then we initialize our String[] "columns" structure with the desired field name from the database. We now create an int[] array to hold our view id's in which we will place the column data. Now we can pass our "columns" and "to" values to our SimpleCursorAdapter class. And finally assign the adapter to our ListView.
You can add more things like a stored image from the database by adding the column and view id of that database field and add these values to our "columns" and "to" variables respectively.
We will cover Databases, and multiple fields, and it's relative methods and stuff in our Database tutorials.
Some Commonly used Methods and Attributes
As mentioned on the previous page we can modify a lot of the ListView attributes by modifying the underlying item's layout XML file, in our case that would be the list_item.xml file.
Here is a list of some common attributes and methods of the ListView
Attributes
- android:divider - Sets the drawable or color to draw between list items, this is useful for inserting your own line graphics.
- android:dividerHeight - Sets the height of the divider drawable or color.
- android:entries - Reference to an array resource that will populate the ListView. This is useful if you just want to display a static set of items without the use of an adapter.
- android:footerDividersEnabled - When set to false, the ListView will not draw the divider before each footer view.
- android:headerDividersEnabled - When set to false, the ListView will not draw the divider before each header view.
- android:cacheColorHint - Indicates that this list will always be drawn on top of solid, single-color opaque background. If you are getting some flickering during scroll operations, consider setting this to android:cacheColorHint="#00000000".
- android:choiceMode - Defines the choice behavior for the view. These can be: none, singleChoice, multipleChoice, multipleChoiceModal.
- android:background - A drawable to use as the background.
- android:clickable - Defines whether this view reacts to click events.
- android:id - Supply an identifier name for this view, to later retrieve it with View.findViewById() or Activity.findViewById().
- android:longClickable - Defines whether this view reacts to long click events.
Methods
- addFooterView(View v) - Add a fixed view to appear at the bottom of the list.
- addFooterView(View v, Object data, boolean isSelectable) - Another variation above the above method.
- addHeaderView(View v) - Add a fixed view to appear at the top of the list.
- addHeaderView(View v, Object data, boolean isSelectable) - Another variation above the above method.
- getAdapter() - Returns the adapter currently in use in this ListView.
- setAdapter(ListAdapter adapter) - Sets the data adapter to use for this ListView.
Events and Callbacks
- getOnItemClickListener() - The callback to be invoked with an item when this AdapterView has been clicked, or null id if no callback has been set.
- getOnItemLongClickListener() - The callback to be invoked with an item when this AdapterView has been clicked and held, or null id no callback as been set.
- setOnItemClickListener(AdapterView.OnItemClickListener listener) - Register a callback to be invoked when an item in this AdapterView has been clicked.
- setOnItemLongClickListener(AdapterView.OnItemLongClickListener listener) - Register a callback to be invoked when an item in this AdapterView has been clicked and held.